We present two CCD images of comet C/1999 J2 (Skiff) taken on 1999 May 23, using the 0.4m f/5.5 of the Observatory of Cavezzo (MPC 107). Both images are still preprocessed (dark and flat corrected) but only one of them (C99J2L05.FIT) was astrometrically and photometrically calibrated with ASTROART (ver. 1.04 or higher). In this tutorial we will learn how to identify a small faint moving object like this comet and how to calibrate the other image (C99J2L01.FIT) using the included GSC star atlas and/or the USNO SA1.0 /2.0 CDROM. For this exercise you should download the file 99J2.ZIP containing the two images. 1. Working Desktop Set-Up
Download and unzip the file 99J2.ZIP: open with File | Open FITS the two images C99J2L01.FIT and C99J2L05.FIT.
NOTE
You can open two (or more) images at once selecting them with the Ctrl or Shift button and the mouse.
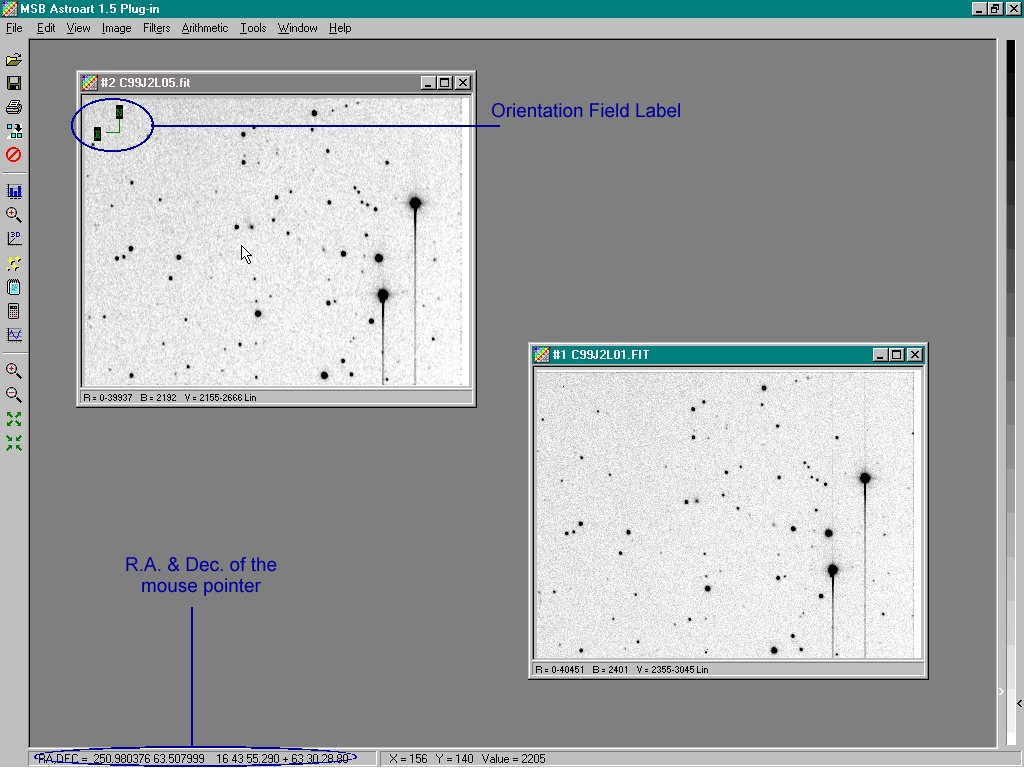
Now let's have a look at the two images:on the top left corner of C99J2L05.FIT, there is a green orientation field label: this is the sign of an image that has been astrometrically calibrated. Open its FITS Header with Edit | Header FITS and you will find the
WCS (World Coordinates System) keywords (CTYPE, CRVAL, CRPIX ...etc.). With the values of these keywords the pixels of the image and the real sky coordinates (R.A. and Dec) are "linked" together: infact, if you roll with the mouse pointer on the window you can read the real sky coordinates of the pointer (R.A. and Dec in decimal and in sexagesimal format) on the left side of the status bar at the bottom of the desktop (Fig. 1).
Fig. 1 - The Desktop Set-Up
2. Finding the object
Comet C/1999 J2 (Skiff) was not a particulary bright object (about mag. 15) but, like all the comets, it is a moving object with respect with the fixed stars field and we can easly identify it with the digital blink included in ASTROART: select the image C99J2L01.FIT and run the command View | Blink: the two images, not aligned yet, start flashing in the C99J2L01.FIT window and a square dialog window will appear with 4 red arrows (2 for each x,y directions) and a little marked scrollbar: click on the arrows until you will read dx=2 and dy=3 on the title bar: these are the shift values (in pixel) of the first image with respect with the second. Now the stars appear steady but the moving comet appears like a fuzzy object blinking in the center of the image. Moving the little cursor on the marked scrollbar you can easly change the blinking speed.
NOTE
You can blink a zoomed area too (simply zooming one of the two images) but you have to increase the shifting values (with a zoom of 400% dx=8 and dy=12). See Fig. 2 below.
Fig. 2 - Blinking a zoomed area of the two images.
3. Astrometric and photometric calibration
ASTROART includes a star atlas based on the GSC catalogue with the first goal of supporting amateur astronomers in their astrometric measures of comets and minor planets; moreover it is possible to perform photometric valuations based on the same catalogue but you should consider that GSC is NOT a photometric catalogue and that doing absolute photometry needs a long ad hard work to do: a set of standard filters, an accurate instrumentation setup and calibration, standard stars fields, a quite perfect flat fielding correction, a not very simple data reduction tecnique and so on ... this will be the subject for others ASTROART in LAB. For the moment let's do an accurate astrometric calibration and a rough but simple evaluation of the brigtness of the comet.
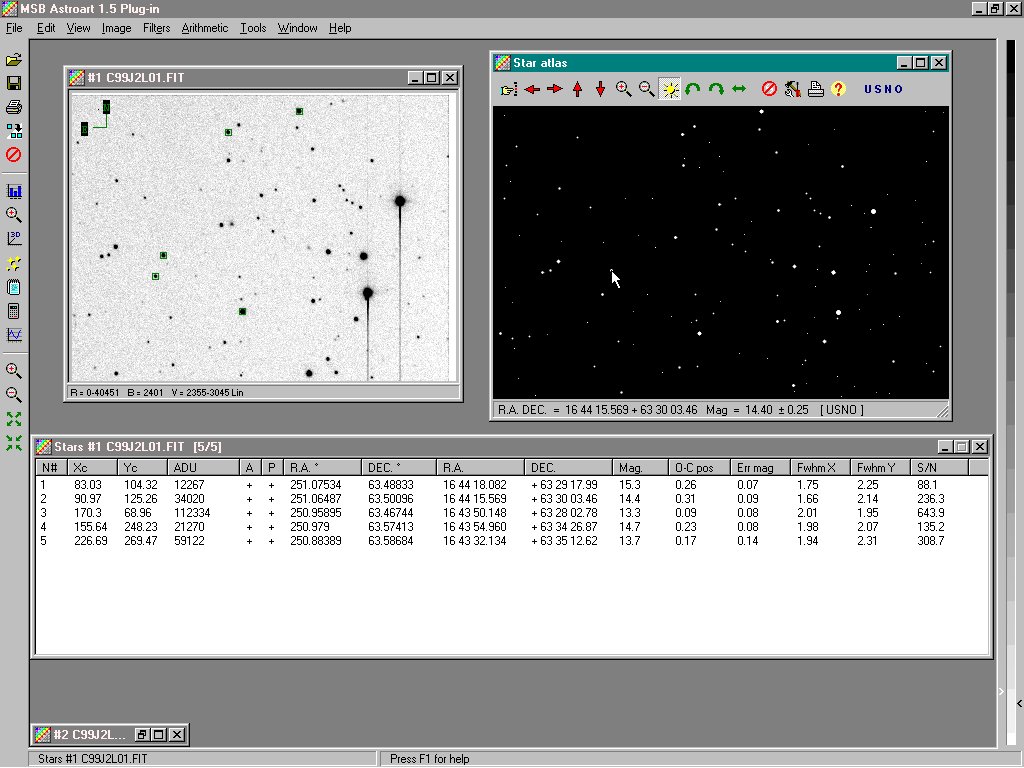
Select the calibrated image (C99J2L05.FIT) and open the Star Atlas with Tools | Star Atlas: the Star Atlas window will open exactly in the center of the field of the image because of the WCS data in the header: obviously, in the case you do not have a calibrated image of the field you can input manually the coordinates within the Star Atlas commands. Click on the sun icon of the Atlas if you want to enhance the brightness of the stars.
If you have got one, insert the USNO SA1.0 or SA2.0 CD and click on the USNO icon on the Star Atlas: now the field appears more crowded of stars and you have a wider choice of reference stars than before. Note that, moving the cursor on the stars of the Atlas, it changes its shape, becoming a little circle (it does the same on the CCD images) and on the status bar of the Atlas appears the catalogued data (USNO or GSC) of the pointed star.
Open an empty Star Sheet with View | Stars minimize the calibrated image and set-up the desktop about as you see in the Fig. 3 below. Select the image that you have to calibrate (C99J2L01.FIT) and pick out at least 4 reference star (obviously stars that are present on the Star Atlas) clicking the mouse button when the cursor changes the shape and becomes a little circle: the stars will be marked with a little green box and the first four columns of the Star Sheet (
N#, Xc, Yc and ADU) and the last three (FwhmX, FwhmY and S/N) will be filled with the data of the CCD image. At the end you should have as many rows as many are the reference stars selected from the image (do not select the two brightest star on the right side of the image affected by a big smearing effect).
Fig. 3 - Calibrating the image
Now we want to associate each selected star of the image with the correspondent star of the catalogue(s). Click with the mouse on the first star on the Star Sheet: a light blue dotted cross will flash indicating the selected star on the image; now go to the correspondent star on the Star Atlas and click on it when the cursor changes its shape: the Star Sheet will be filled with the astrometric and photometric data of the catalogue(s). Repeat this step for each reference star and you will find the Star Sheet as shown in the Fig.3 above. Note that the + sign in the
A (astrometric) and P (photometric) columns stated that the star will be used as an astrometric and/or photometric reference for the following data reduction steps.
Select again the image C99J2L01.FIT then, with Image | Astrometry open the Astrometry dialog window: click on Calculate then on Exit; the astrometric calibration of the image is now completed. A green orientation field label is appeared on the top left corner and, rolling with the cursor on the image, you can read RA and Dec coordinates in the status bar of the desktop (Fig. 1). But the first very important thing to do is to check if calibration process was properly done; look at the
O-C_pos column in the Star Sheet: in this column the difference between the position from the catalogue(s) ("Observed") and the "Calculated" position of the reference star is calculated (in arc seconds): are there any values > 1"? If yes, you surely will not reach the necessary precision needed by the Minor Planet Center (within 1") to accept your measures and if almost all the values are >>1" there is a good probability that you did a mistake in associating one or more stars from the image to those of the catalogue(s). In these cases you can delete one or more stars and/or repeat the astrometric calibration until you can reach desired precision. Now you can open the Photometry dialog window with Image | Photometry , click on Calculate then on Exit and your photometric calibration is done: saving the image, ASTROART will write on the FITS header the correct WCS keywords and the frame will be permanently calibrated.
In the next item of "Astroart in LAB" we will generate an M.P.C. report (ready to send by E-mail) with the two position of the comet.