Here is a simple example on how obtain fine RGB planetary images with a typical amateur instrumental set-up and the preprocessing, filtering and trichromy tools in Astroart 2.0. Andy Heath took a set of 10 frames of Saturn for each colour with his Meade 10" LX200 working at an Feq. of about 33 meters with eyepiece projection. He used a Starlight MX5-16 camera with Lumicon slider/filter holder and TrueTechnology dichroic filters with an IR blocking filter screwed into the nose of the camera.
1. Preprocessing
After accurate focusing, Andy grabbed 10 frames of the planet for each colour channel: the exposure time for each frame and for each channel was of 1 second. Now is the time to preprocess and align the three sets of images:
- open an image of the RED set and select a rectangle around the planet: this rectangle will be used as a reference for the automatic aligning using the "Correlation Method";
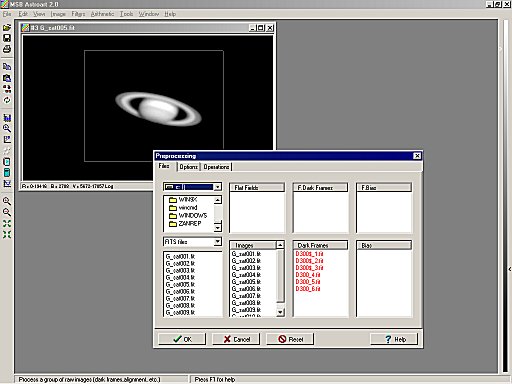
Fig. 1 - Start the preprocessing procedure loading an image of the set and dragging with the mouse a big rectangle over the planet. Then open the preprocessing window and drag and drop the files.
- open the "Tools - Preprocessing" window, select the directory where the frames are stored and drag them with the mouse in the "Images" box (Fig. 9-1);
- select the "Option" tab in the "Preprocessing" window: in the Images group select Average and in the Option group select "Auto alignment". In the Align window select Correlation.
Fig. 2 - When you select the Auto aligning option, the Align window will pop-up on the screen: select the "Correlation method" to align a set of planetary images. The coordinates X and Y are the edges that define the selected rectangle.
- Now, you are ready to run the preprocessing task: click on the OK button and let Astroart work for you: if you keep selected the option "Confirm each image" in the Option tab, you will be asked to confirm each aligmnent step.
- At the end of the process you should have an image labeled NonameXX where XX is a progressive counter. Save it as R_xxx. fit (The letter of the filter R before any other label xxx allow Astroart to automatically recognize the colour channel when you will open the tri-colour window).
- Repeat steps from 1 to 4 for the GREEN and BLUE sets of frames. Then save the masters as G_xxx.fit and B_xxx.fit
|
NOTE |
The correlation method used to align planetary images is strongly dependent on the seeing condition of the sky and on the actual position of the planet in each frame (there should not be big differences among the same set). It is not rare that it could fail with some frames of the set: you should accurately select the best frames of the set before starting the aligning procedure. You could also try again the preprocessing routine selecting a different (bigger) rectangle around the planet and then clicking again on the "Auto alignment" check box to reset the aligning parameters. Astroart keeps all the other parameters in memory, so you do not have to redo the whole procedure.
|
2. Aligning and resizing the master frames
Now, you should have 3 master frames, one for each RGB channel (Fig. 3). From this section and for your practice you can download the three Andy's FITS master frames here (about 0.5 Mb).
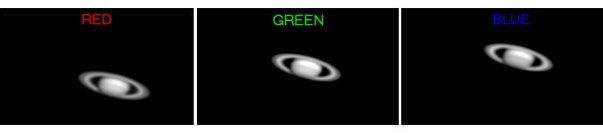
Fig. 3 - The three master frames after the preprocessing.
These master frames appear correctly aligned for each RGB channel, but now we need to align them with respect to each other. We must select a reference "fixed" image: we can immediately select the GREEN master because it is the most centered in the frame. Note that this time the planet is placed in three very different positions with respect with the frames then there is a good chance that the correlation method could fail. We can proceed in many ways but now we want to show how to manually align the RED and the BLUE frames with respect with the GREEN one and then refine the aligning using again the correlation method.
- Open the Preprocessing window and drag and drop in the Images box the three RGB master frames saved in the previous steps (Fig. 4); be sure to drop the GREEN file (the reference one) at the top of the other two.
- Go to the Options tab and select Keep in the images group and Manual alignment in the Option group.
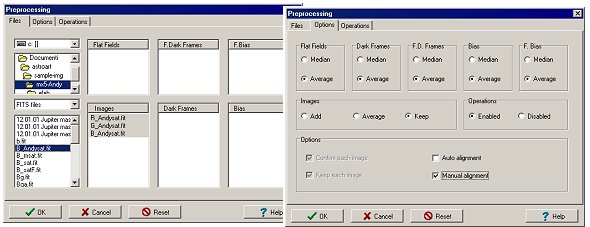
Fig. 4 - We use again once more the powerful Preprocessing window to manually align the three frames.
- Click on OK to start the manual alignment: Astroart will open a zoomed window on the first frame (FIG. 5): select a reference fixed point on the shape of the planet (here we select a point between the rings and the disc of the planet). Even if this manual aligning tool of Astroart is capable of subpixel registration, at the moment do not worry about the precision: just select a similar point within the three master frames.
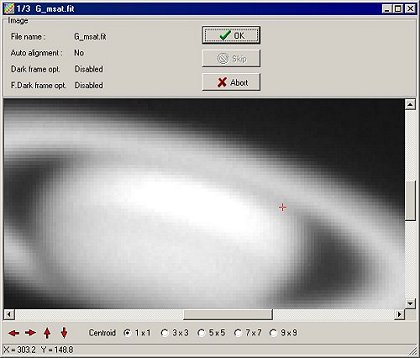
Fig. 5 - The Manual Align window: select with the mouse a common reference point into the three frames (red cross).
- Now you have the three master frames that are "nearly" aligned with respect with the central green master frame: save them with the same names (overwrite the old ones), select a big rectangle around one of these frames, and repeat the alignment with the Correlation method. Save again the three masters overwriting the files.
- Now you must resize the three RGB masters to restore the true proportionality to the shape of the objects: this is due to the pixel geometry of the MX5 CCD camera: indeed the pixels of the MX5 are not square but rectangular (9.8 x 12.6 microns). This is quite simple with Astroart: select one of the master frames, go to the main menu Image | Resize to open the Resize dialog window (FIG. 6): in the list box of the Scaling group select MX 5 (Andy's camera is a MX516) and keep the default option Bilinear in the Interpolation group (but you can also try with a Bicubic and a Gaussian interpolation: the latter is a little bit more blurred that the others and preferred in deep sky images).
Fig. 6 - The Resize window is used to restore the correct geometric image ratio.
- Repeat the previous step for all the 3 RGB master frames: you should now obtain 3 aligned and correctly resized as seen in Fig. 7
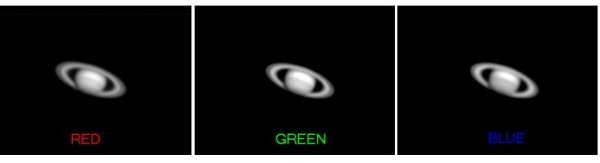
Fig. 7 - The three master frames resized and aligned.
3. Combining the colours
Now we are ready to play with colours! Open the three RGB master frames on the Astroart desktop and be sure that all are displayed with the Linear transfer function (check the status bar of each image; press F8 to change in Linear the transfer function).
Arrange your desktop as seen in Fig. 8: on the left the 3 RGB master frames and on the right the corrispondents Histogram windows.
Histograms and linear transfer functions appears quite different: if we colour combine the frames with these visualization scales we will obtain an image with almost unnatural colours (see the unprocessed image of Fig. 10) and we should balance them until we obtain a perfect dark background sky in each of the master frames.
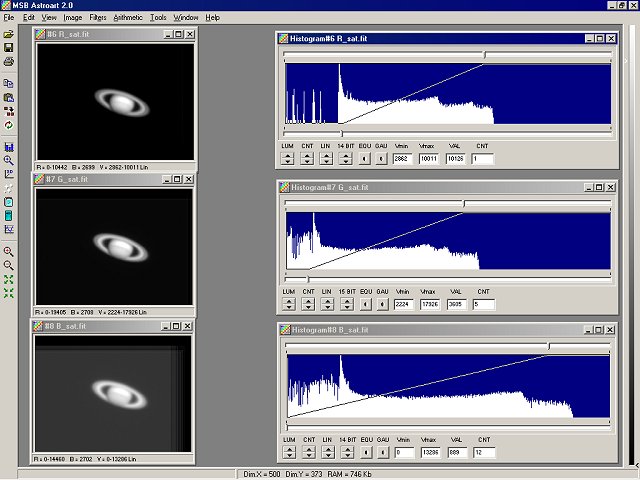
Fig. 8 - Histogram window is a fundamental tool to work with displaying functions with Astroart.
The highest peak on the histogram graph represents the sky background value of the image (this is true for almost all the astronomical images where the main part of the pixels covers the dark sky background): move the lower cursor of the Histogram window below this peak. The right edge of the histogram represents the end of the light signal of the planet: move the upper cursor in coincidence of this edge as shown in FIG. 9.
Now we can open the Trichromy window (use the shortcut Ctrl+T): if you saved the master frames with the first letters as R, G, and B, Astroart automatically selects them for the colour combining and you have simply to press the Preview button to see the result (FIG. 9): now colours appear more natural but you can always tune the brightness and contrast of each colour channel moving the cursors of the correspondent Histogram window.
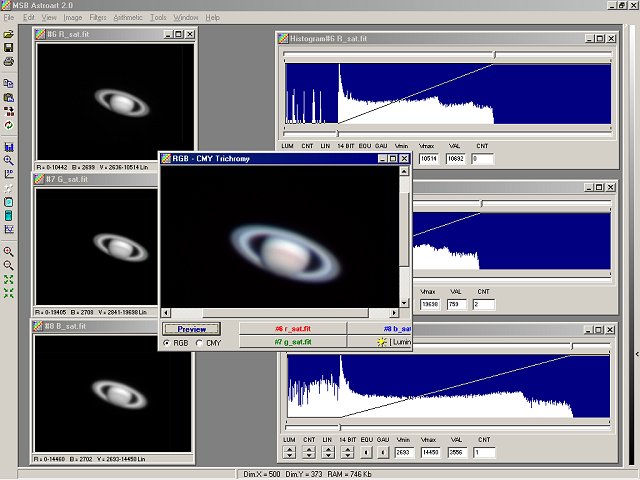
Fig. 9 - A first glance with a colour balanced frame of Saturn.
As a final touch you can play with filtering: unsharp masking is always very effective on planetary images. Here we applied an Unsharp Mask filter with Sigma = 2.0 and Coefficient = 3.0 over each of the three RGB master frames. After this, right click on the Trichromy window to save your work.
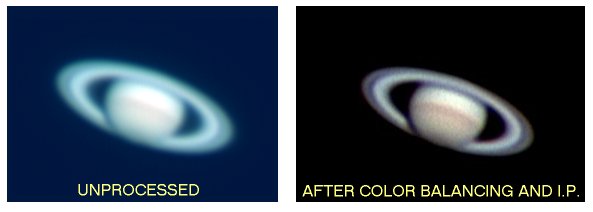
Fig. 10 - After colour balancing and image processing, the improvements on the quality of the image are evident.
© 2000
A. Heath., M. Nicolini - All rights reserved