This Lab provides an overview of the processing stages necessary to produce an MPC report with astrometric positions of a minor body of our Solar System. At first we will learn how to configure Astroart for a correct and almost automatic astrometric work; then we will compile an MPC report with the positions of the comet C/1999 J2 (Skiff) ready to send to the Minor Planet Center. We need the two images used in Lab#5 (99J2.ZIP). Both images should be astrometrically and photometrically calibrated as described in the previous Lab.
1. Setting the Preferences
As first time, we should set some fixed parameters of our instruments and location. Open the image C99J2L01.FIT and examine its FITS Header with Edit | Header FITS. Note the keywords that store the date, time and exposure of the image: these keywords must be the same of those shown on the three text labels at the bottom of the MPC Report folder of the Tools | Preferences window (Fig.1). Note also that, because at the Observatory of Cavezzo all the acquisition systems have the clocks settled on the Universal Time, the times recorded on the images headers are U.T., so the difference between U.T. and L.T. (Local Time) is null. At the top of the same folder (the header of the MPC Report) edit your Observer's data as described in the Format For Optical Astrometric Observations Of Comets And Minor Planets
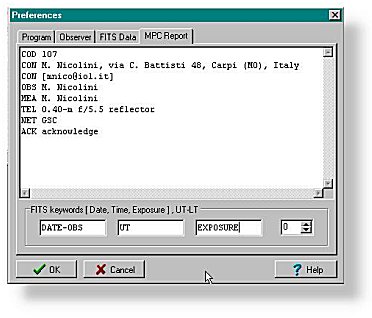
Fig. 1 - The MPC Report Preferences Folder
|
NOTE |
These astrometric keywords must be present and must be the same in each image header of the measuring session. This is obvious if you use the same CCD camera for all your observing session but they could be different if you change CCD device or instrumental set-up.
|
2. Measuring the positions
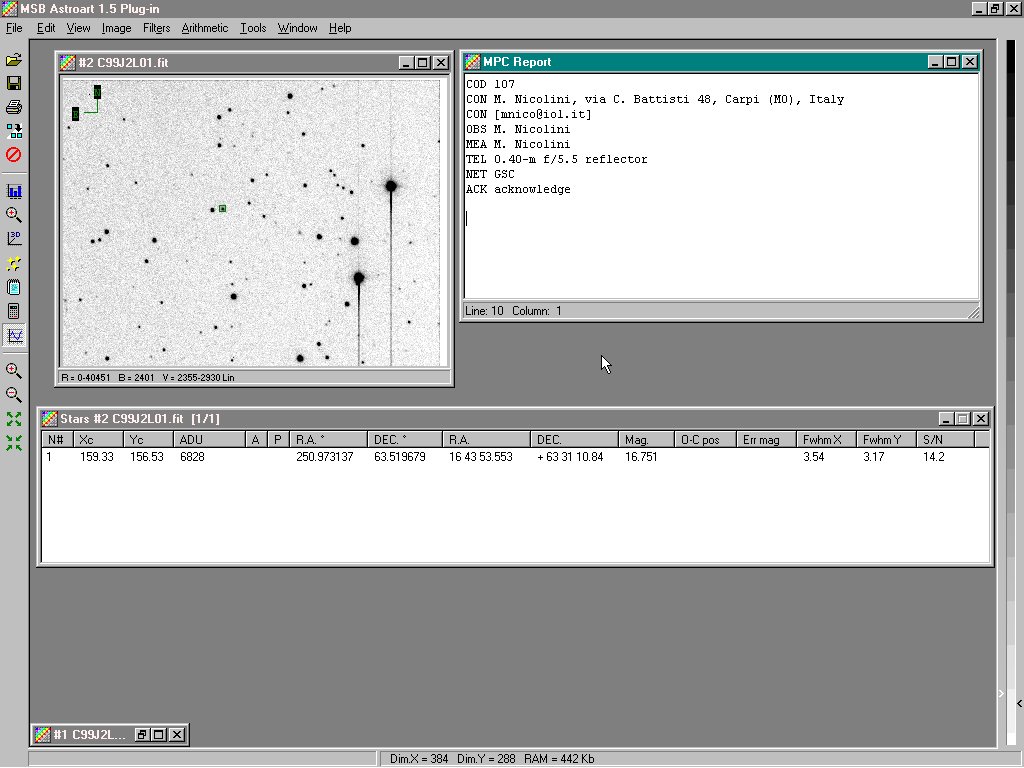
Now that we did the correct configuration of Astroart, our astrometric task will be very easy and fast. Open the first image (C99J2L01.FIT), then open the Stars Window with View | Stars. Move the cursor over the comet's coma until it changes the shape with a little circle: got it! Click on it and a little green square will appear around the comet's centroid. At the same time all the astrometric and photometric data will appear in the first row of the Stars Window.
|
NOTE |
Sometimes the little green square could not appear exactly centered over the centroid of the object: this is due to a simple (but fast) software visualization; you have not to worry about it: the calculated value of the centroid is always correct with a subpixel precision.
It could happen that the object has a very low S/N ratio and the automatic centroid recognition of Astroart fails (the cursor do not change in a little circle when it is over the object). This should suggest you that any measure of positions and magnitudes of the object will be affected by large errors. Nevertheless, you can force Astroart to "recognize" an object's centroid: always with the Stars Window opened, simple hold down the shift button while dragging with the mouse a little square around the object: to facilitate the selection of the square, you can operate even on the zoomed image.
|
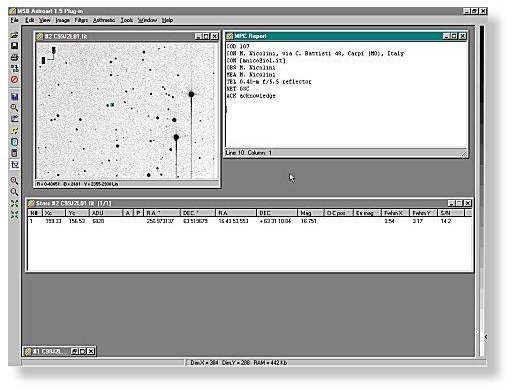
Fig. 2 - Filling the MPC Report.
Now, open the MPC Report Window with Tools | MPC Report and size it on your desktop as shown in Fig. 2: it should show you MPC Report header with your data and with a flashing cursor waiting for your astrometric records. Go back to the Stars Window, select with a click the row with the comet's data then click with the right botton and choose MPC Report in the pop-up menu. The MPC Record Window (Fig. 3) will show you all the astrometric data of the comet for this CCD frame.
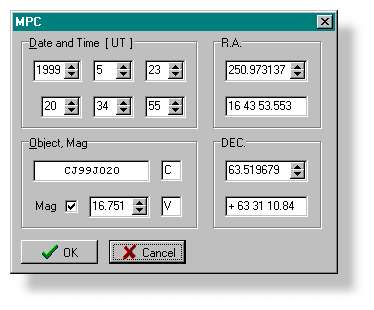
Fig. 3 - The MPC Record Window
Note that Astroart calculates the exact mid-exposure time, the magnitude and the position of the object; the only thing you should edit is the string of the object designation (be sure to read carefully the MPC rules). Click the OK button and the observational row will appear in the MPC Report Window. Open the image C99J2L05.FIT and its Stars Window and repeat the same steps to add a second position in the MPC Report: you should obtain a final report like this shown below:
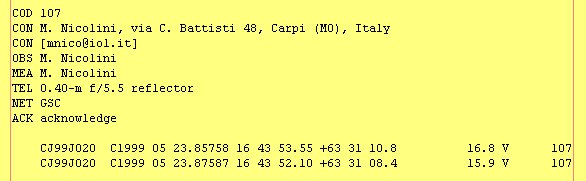
This report is ready to be sent as a pure ASCII file to Gareth Williams (gwilliams@cfa.harvard.edu) at the Minor Planet Center: save it as any usual txt file and attach it at your e-mail message.
|
NOTE |
Actually the MPC Report Window is a true text editor: click on it with the right mouse button and a pop-up menu will appear with all the most common commands usually found in an editor. You can even save and re-open a report to add new observational record without worry about the actual position of the cursor: Astroart will add any new record within the correct columns!
|
© 2000 M. Nicolini - All rights reserved